All-in-One WP Migration Current Site
On the current wordpress site, download All in One WP Migration Plugin

On the sidebar, select the Export option found on the All-in-One WP Migration dropdown

Select “Export To” and then the “File” option

It will start archiving files to prepare for export, download the backup

Download the file

Setting up cPanel account
Refer to this SOP for setting up new cPanel account
All-in-One WP Migration to unpublished cPanel
Accessing the wordpress dashboard inside our cPanel before changing the DNS #
We cannot access the empty wordpress dashboard if we dont follow these steps
For this article, we have Windows 10 OS system. First, navigate to C:\Windows\System32\drivers\etc.

Right-click on hosts → Edit with preferred file editor (Run as Administrator). You can use windows default NotePad application to edit file instead of going with Notepad ++, which we’ve used for this article.
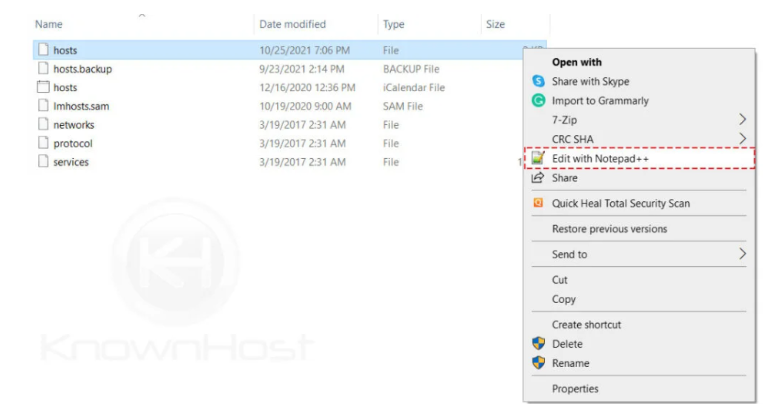
Now, enter the domain following the server IP address.
Format:
<IP Address> domainame.com www.domainame.com

Save the file.

Windows maintain DNS cache on the system. Next, you need to flush the DNS using Command Prompt (CMD).
DNS Flush Command
ipconfig/flushdns

o test the made configuration, use the ping command on command prompt,
Syntax Of Ping Command
ping <IP ADDRESS / DOMAIN>

Access the empty WordPress dashboard via Cpanel and add the All-in-one WP Migration plugin #
After you done those steps above, you can now access the unpublished WordPress dashboard in the Partopia cPanel
Install the All-in-one WP Migration plugin
Access Festinger’s Vault here: https://festingervault.com/wp-login.php . Ask manager for the logins.
Once inside the Festinger’s Vault homepage, search for All-in-One WP Migration

Find All-in-one WP Migration Unlimited Extension plugin and download to WordPress

Once the plugin is activated, you can now import files that are more than 512 mb in size
Go to the Import Section in All-in-one WP Migration plugin found on the WordPress sidebar

Select “Import From”, and then “File”

Select the backup that you just downloaded from the client’s current (live) wordpress. Be aware of the prompts that pop up that you need to accept.
While uploading, do not switch browsers or minimize. Be on that browser for the whole process. You can take a break if you want to.
For this example the website size is 5gb, it took 2-3 hours to upload
Transfer Dreamhost DNS records
Login to the old Hosting (in this example, it is Dreamhost) and on the side bar, select “Manage Websites”

Click on DNS that is inline with the website that you are going to transfer

Take note of the DNS Records

Go back to cPanel and transfer all of the records that are not in the system already, for this example the Google ones.
Do not touch the records that includes ip addresses on them like the A records.
Also, do not include the NS records, we already transferred that earlier, no need to place those NS records in the DNS records.
Transferring the nameservers
Once done uploading the website to our cpanel, go to the current domain provider. For this example it is GoDaddy
Sign in to your GoDaddy Domain Portfolio
Select the checkboxes next to the domains you’ll be updating

Select Nameservers from the menu
Change the nameservers to ns1.partopia.ca and ns2.partopia.ca
Updated: to ns3.partopia.ca and ns4.partopia.ca – we do not use ns1 and ns2 anymore

Select Save, then Continue to complete your updates.
You’ll see a Success confirmation letting you know the nameservers have been updated. Most DNS updates take effect within an hour, but could take up to 48 hours to update globally.
Note: If the client uses a third party mailing software, such as google workspace or microsoft office, change the mail routing settings to “remote mail exchanger” on cpanel. Cpanel > Tools > Email Routing
Confirm Email Deliverability #
Lastly, send a test email to one of the clients emails as follows:
Subject: test
Body:
Hi, I’m just testing out your emails.
Please reply if you received this email.